Techniques and Tips
GABBIE’s
Video Tutorial: Creating a Home Decor Wall Hanging
https://www.youtube.com/watch?v=261iPhi_u3k&feature=player_embedded
Dressing Up the NEW Dream Catchers!

Hi Everyone!
I thought I would share a little post on how I dressed up the NEW Dream Catcher chipboard on my latest layout. This is such a pretty and detailed chippie and I thought I would have a little fun with it and use some traditional items like beads and feathers to dress it up some more! Here is a photo step by step on how I prepped the chipboard and dressed it up for my page….


Once I completed the first 3 steps as shown in the photos above, I added a little bit more detailing to the Dream catcher by stringing some beads on a piece of wire (I actually just used the wire stem I’d cut off of a flower I’d used for this), and attached it to a couple of the loops in the Dream catcher chipboard piece. Then just before I added my piece to the page, I glued down a small piece of muslin underneath it and glued a couple of real feathers beneath the chipboard feathers. Here are some more up close details….


I hope you give this fun new Chippie a try!!

http://gabriellepollacco.blogspot.ca/2013/02/how-to-catch-your-drea…
EASY TEXTURED CHIPBOARD TECHNIQUE
1. I built up the frame with two layers of thick gesso, pouncing a stiff brush to leave peaks of gesso (and drying completely between the layers applied).
2. Next, I sprayed with a peachy pink mist, from a distance, to lightly coat the chipboard.
3. Dark pink mist was randomly applied, but this one was sprayed very close – to have it pool around the gesso peaks. The peaks act like a resist to give a nice rippled textured effect.
4. On the letters I simply primed them with white gesso and then applied glass bead gel.

RUSTING POWDER TECHNIQUE
A Dusty Attic chipboard piece (I have used a Mini Hinge, DA1006), Rusting Powder (DA0995), Clear Gloss Varnish (DA0901), White Vinegar in a Mini Spritz Bottle (DA0610). I have also used white gesso.

I first painted the hinge with white gesso.

Before the paint had dried I sprinkled the rusting powder on the chippie, this way no glue is needed. I then sprayed white vinegar on the hinge and let it dry. I added another spray after a while. The effect when the rusting powder reacts to the white vinegar is so cool! It changes color and becomes more brownish – which gives the rusty effect. You may have to add vinegar several times to get the effect you want.

When I was satisfied with my rusty effect, I added the Clear Gloss Varnish and let everything dry.

And here’s the hinge when ready – all rusty and pretty, ready to be used!

Here’s the hinge on my finished project:


FAUX EMBOSSING
How did I achieve the faux embossed swirls on the shield? I painted a generous coat of gesso and right away topped it with DA clear crackle varnish. I used a kabab skewer and “drew” swirls before the crackle started to dry. So easy!

Altered Journal by Belinda Spencer

STEP 1:
– Apply PVA glue to the front cover and add torn pieces of book paper all over. You can let the paper extend over the sides and then fold under and tape down later when the glue is dry. This will give you a nice look for the inside cover.

STEP 2:
– Now that the glue is dry, use a dry sponge to swipe some gesso lightly over the whole surface. Start with a very small amount of gesso on the sponge. You don’t want it so thick that you can’t see the text paper through it. It is best to keep it fairly dry to prevent any warping of the cover too.

STEP 3:
– Place a template over the dry surface and swipe some Gel Medium over it with a palette knife or used credit card. Set aside to dry.

STEP 4:
– Now comes the fun part: adding colour!! I have used a combination of Pickled Raspberry, Peacock Feathers and Seedless Preserves Distress Inks and rubbed into the cover with a sponge.

STEP 5:
– Next I applied Dylusions Ink Sprays in Bubblegum Pink, Crushed Grape and Vibrant Turquoise. These colours are BRIGHT!!! They were even just a little too bright so I added some water to a Dusty Attic Mini Spritz Bottle and sprayed over the cover. I lifted the journal up at the top and allowed the water to run down. Once dry I sponged a little gesso over the top.

STEP 6:
-Once I had the background completed, I started to layer on some embellishments. First I added some pieces of the Marrakesh Trellis small that I had painted with gesso. Once they were glued in place I then sponged some more gesso over the top.
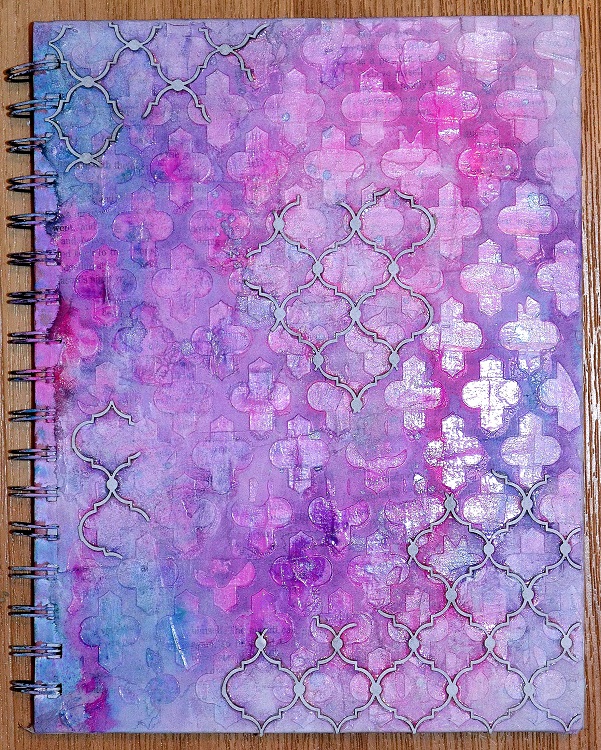

STEP 7:
– Then all remaining embellishments were added to give the journal a Moroccan feel.


I used the same Dylusions Ink Sprays to colour my Dusty in Bloom flowers and then applied gesso to the edges once they were dry. The face embellishment was made using a Moulds by Mel face mould. I used Martha Stewart air drying clay. Once it was dry I applied Dusty in Colour Bisque and Alabaster. To give it a more aged look I also applied Dusty Attic Crackle Varnish and then sprayed Dylusions Vibrant Turquoise over the top wiping away the excess so the colour remained mostly in the cracks.
My chipboard and Dusty In Bloom leaves were all painted with gesso and then Peacock Feathers Distress Ink was added to the edges.
Products used:
CHIPBOARD:
DUSTY IN BLOOM:
DA0810 Leaves
DUSTY IN COLOUR:
Thankyou so much for checking out my tutorial and project today!! I hope it has inspired to get altering your own Dusty Journal!!
Cheers
Belinda