Blog
Dream Big – Ankarika Craft
Hi there!Today I’m describing the project that I made during the live stream on the Scrapbooking Day profile, May 8th, 2022. The recording is saved and for those willing – waiting here. How did you spend our crafty day? Shopping is done? Do you take part in competitions? At my profile, a contest is waiting for you: just make any project for a man using 3D flowers and submit your design on my Fb profile here. You can win the products of the brands that I used during the live stream, worth $65 (AUD) – you are more than welcome to join us!
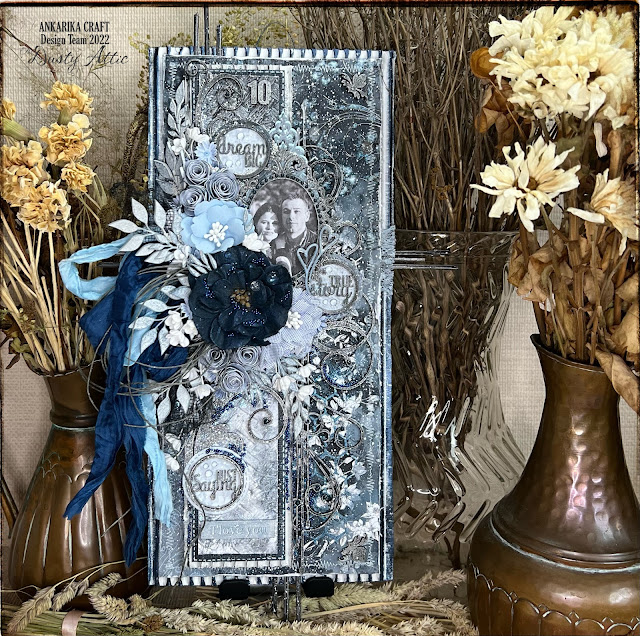
It’s an oblong panel in blue shades, which I’ll give as a gift to my husband on the occasion of our 10th wedding anniversary. I have hereby made an attempt to create a design for a man, but with the use of delicate elements such as lace, bows and 3D flowers.
The broadcast lasted only an hour, I had to fit in this time, because the next person with her project was coming after me. So I prepared everything I could in advance, but I tried to make the recording still provide a large dose of knowledge and inspiration. I cordially invite you.

It was the first time that I made a longitudinal panel and I must admit that this form of work suits me very well. The shades of blue fit perfectly into the moodboard challenge currently underway on the Dusty Attic profile. See for yourself below what wonderful colors are on this poster. Or maybe you too will take up this challenge? All you have to do is add your work to the comments section of the Dusty FANattics Facebook group for your chance to win one of two amazing prizes of $50 (AUD) on purchases from their store. I can’t wait to see your work on the Dusty FANAttics group.

I made the base myself. I cut two pieces of stiff cardboard to the size of 30cm x 13.5cm, one of them secured with a white gesso and the other with a black gesso. I additionally applied the black one along the edges with Old Silver wax. I glued both parts together for a more rigid structure.
Then I cut a piece of corrugated cardboard to a size 1 cm larger than the base. I whitened the corrugated cardboard with white gesso, stained protruding edges with black gesso and additionally coloured with Old Denim wax. I cut the corrugated cardboard slightly above the centre and glued it symmetrically to the base so that there is an even frame around the base, and at the same time there is a gap of about 1.5 cm in the middle. In the space between the corrugations of the corrugated cardboard I glued skewers sticks. Broken in half, painted with black gesso and Old Silver wax, I placed it unevenly so that they protruded beyond the frame of the project. I masked the space with the sticks with a delicate crown in the shade of duck egg.

For this project, I chose a sheet from the “Love me tender” collection, it was beautifully combined with the idea I had in mind, among others due to the fantastically atmospheric flower pattern. I cut a piece 6mm smaller than corrugated cardboard, torn the edges and sewed them on the machine, and secured the whole thing with a clear gesso. I applied a chicken wire stencil pattern using Nuvo’s Volumizing Mousse in the shades of Boatyard Blue and Worn Linen. It is a very pleasant paste that changes its consistency when heated, becomes granular and sets quickly. I glued the prepared background on the bottom with cardboard to stiffen it and obtain the effect of layering, and then I glued it to the previously prepared base.
Then I prepared a smaller panel, measuring 6cm x 29cm. I cut a piece of paper from the same sheet, sewed it on the machine and torn the edges. I embossed this piece of paper, using a 3D folder from Sizzix imitating a woven basket. Before putting the paper in the folder, it is a good idea to spray it gently with water for a better embossing effect. I stuck it up with a piece of black paper of a slightly larger size for a frame effect. I drew lines on the black paper with the white Gelly Roll pen, imitating sewing. And I glued this onto an even larger piece of corrugated cardboard, which I worked out in the same way as the previous one.


There are several chipboard designs from Dusty Attic on the project. They are secured with white or black gesso and then I highlighted the edges and gave the colour with waxes: Old Silver or Faded Denim. On the bottom of the project I put two beautiful patterns with swirls: Iron Garnish #4 and Leafy Flourish, then a little above the centre I stuck a photo of me with my husband on our last family trip. The photo is enclosed in a fantastic frame, which I glued on the bottom with a different frame made of a die and the same sheet of paper, and on top I decorated it with delicate vintage drops from Nuvo in the shade of Worn Navy. I also put cute hearts in the lower part of the frame.


At the bottom of the flower arrangement I put a navy blue, blue and black coloured gauze. Below the frame I have attached a beautiful flower from 49 and Market, which was originally in a shade of deep matte navy blue, and I brightened it up a bit with Faded Denim wax. Around the frame, you can also admire the wonderful and fancifully refined fabric flowers from Ania Rokicka, blue roses and some teeny tiny daisies that I made myself, as well as small white flowers from Tim Holtz. Among the mentioned flowers, I have included cardboard leaves: the larger ones from the Foliage #8 collection, and the smaller ones are Mini Foliage – with the help of the leaves, you can precisely shape the design at your own discretion. Two sumptuous vintage ribbons in shades of navy blue and blue, as well as a grey string, stick out from under the flower arrangement – which together make a great complement.


I have placed cute corners in the upper and lower left corner. On the project I also put three circles with the words “dream big”, “true story” and “just saying”, available in the store as a set with other inscriptions. It is complemented by a declaration of love in the form of the sign “I love you”.
Finally, I’m gonna mention the details that give the design a finish, character and flavour. This time I used: colourless cabochons – there are quite a lot of them on the design, navy blue balls in the lower part of the design, white mini pebbles in the upper part, navy blue glitter here and there, the number “10” at the top and at the end I had to splash the whole thing a bit with white acrylic paint.


Thank you for visiting me. If the content that I publish here is interesting and valuable for you – let me know about it, leave a trace – I will be very pleased. Meanwhile, I’m finishing this entry and I’m going to school for my daughters. Until next time!
Dusty Attic’s products:


See you soon!
Ankarika Craft (Fb)Ankarika Craft (IG)