Blog
Beach Bum – Tina Ollett

Hello and welcome Dusty friends. Tina Ollett with you here today. It seems like an eternity that I was last here, but I am so glad to be back with you today. I am here to share a beachy styled project inspired by the new moodboard.
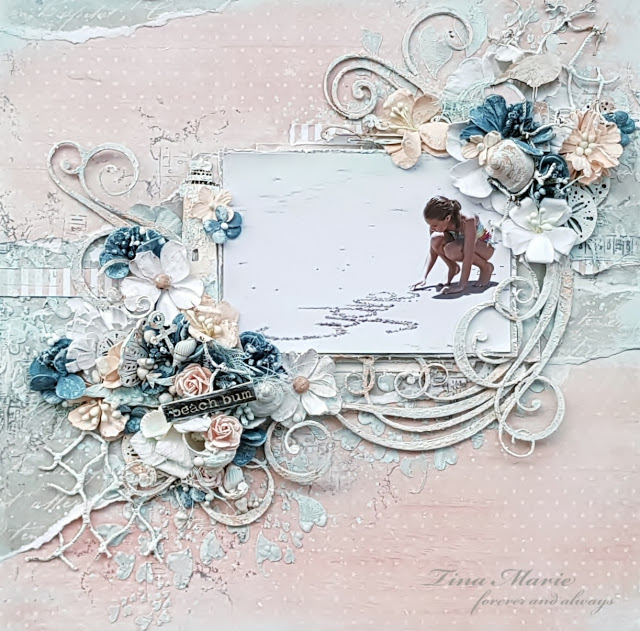
So this is my project titled “Beach Bum”…..

And this is the beautiful moodboard I used. Isn’t it just heavenly. It was so easy to create with this beautiful colour palette and also to do something beachy with this.

I started by layering up my background using some 49andMarket papers from different collections. I love to do this to use up old papers. I have used an apricot polkadot paper as my background piece layered with some apricot honeycomb and a grey script piece.

Next was to add texture to my background page. Firstly I primed my background with a clear gesso. I allowed it to dry and then added some grey acrylic paint to some texture paste, and then I added it through the Dusty Attic Heart Attack stencil. How I love this stencil. It is just gorgeous.

While I was allowing my texture paste to dry I moved on to dressing my yummy Dusty Attic chipboards. I primed them all with white gesso to start and allowed it to dry. I then added lots of texture using crackle paste and a spatula. Lifting the spatula regular gives peaks to the paste. These were then allowed to dry and I then coloured all my chipboards using Inka Golds and some acrylic paints. They will be listed below for you. Below you can see the cute Dusty Attic lighthouse and all the textures created.


I went on to add matting to my photo and adhered this to the background page. I popped some of these layers on a little foam tape to give more dimension.This also allows space for me to tuck in embellishments and of course chipboard pieces. I started arranging my chipboards. This took me some time until I was really happy. I feel the way the scroll pieces have been laid allows for them to look like a frame around my photo. I have used two sets to do this.


I also added in some beach finds being gorgeous shells. These were painted with acrylics to compliment my layout and of course the moodboard. To the top of the photo I have added in the mini Decorative Frame. I added in some leftover paper to the centre of this piece which is one of my favourites. To the top of the framework I added in a cute little seagull perched on a post and I also tucked in a few of the Sand Dollars to both clusters. They were also coloured with acrylic paints.


For my title I used “Beach Bum” from the beach Wordpl@y pack. These are perfect for the layouts that don’t need a lot. I have simply added it to the top of my clustering at the base of the photo as you can see above and below.

And for good measure…. well seriously how could one resist adding in these new release beauties. I tucked one in to my cluster at the base of the project.

I added in some coloured muslin along with some netting and gorgeous florals from 49andMarket. and then did a little random stamping using .

I finished my project off by adding touches of drybrushing with white gesso. I also added in some small art stones and a little more inka gold to my chipboard pieces to help them stand out a little more.
Well that is all from me today. I do hope that you have enjoyed my post today. Until next time take care and happy crafting.

Tina x
